Install Wake on LAN on a NAS
I have a couple of NAS boxes and I wanted to install a Wake on LAN application on one of them so that I could turn my devices connected to the LAN through one of them. The main reason why I wanted to do this is because my home router doesn’t support Wake on WAN (so it’s not able to translate the initial request and broadcast it).
Since the NAS is always connected to the network, I can use it to turn on my home computer for instance: that’ll allow me to turn it on only when I need it.
The NAS
In my specific case I decided to install it on a Iomega IX4-200D. I believe the procedure applies to other NAS devices with just little changes. The reason why I chose this NAS is because I do have a way to get the firmware back to it even when I replace all of the Hard Drives (as it happened once already!). I’ll look at writing a procedure for that whenever I have the chance.
Step by Step instructions to Install Wake on LAN on a NAS
I will try to be as much specific as possible. Be aware that I am not responsible in case you brick your own device.
- Enable SSH if it’s still disabled. You can follow my article that describes how to enable SSH on an Iomega/Lenovo device.
- Connect via SSH to the NAS box. On the link I posted above, it also tells you how to login on an Iomega device.
- Backup /etc/ipkg.conf (if it exists).
- You can backup this file using the following command:
cp /etc/ipkg.conf /etc/ipkg.conf.bck
- You can backup this file using the following command:
- Delete any existing entry in this file, or just remove the file itself by typing:
rm /etc/ipkg.conf
- Add these lines one by one:
src cross http://ipkg.nslu2-linux.org/feeds/optware/cs08q1armel/cross/stable
src cross http://ipkg.nslu2-linux.org/feeds/optware/cs08q1armel/cross/unstable
option verbosity 2
option verbose-wget
- If you need to delete a line, press ESC (enter command mode), then select the line you want to delete with the arrow keys and then type dd.
- Save the file by pressing ESC to enter command mode and type
:x
to exit and save the changes. If you want to exit and discard the changes, type :q!
- If you need to return in insert mode press i followed by an Enter.
- NAS boxes generally have an embedded OS which means they have a read only file system. So we have to use ipkg-opt to get rid of this. Run the commands below:
ipkg install ipkg-opt
- It might complain that the command isn’t recognised. In that case, try to type ipkg update.
- Running ipkg update will give you the below result

- Run ipkg install ipkg-opt again

- Run this:
PATH=/opt/bin:$PATH
- Now backup ld.so.conf and then edit it in vi.
cp /etc/ld.so.conf /etc/ld.so.conf.bck
vi /etc/ld.so.conf
- Append the line below.
- /opt/lib/
- Close the SSH connection. This step is very important.
- Reconnect via SSH.
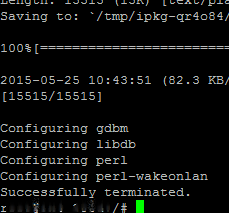
- Run the following (yes, again the update, then we’re good to install the application).
ipkg update
ipkg install perl-wakeonlan
- We’re now good to test this. Type
/opt/bin/wakeonlan 00:00:00:00:00:00
Where 00:00:00:00:00:00 is the MAC address of the machine you’re trying to Wake Up.
Create a script to avoid typing the whole command every time
I use this as it turns out it’s pretty handy and I don’t need to write down my MAC address anywhere and be afraid of lose it 🙂
- Create the actual .sh file
cat > WOLscript.sh
- Run
vi WOLscript.sh
- Add these lines
#!/bin/bash
/opt/bin/wakeonlan 00:00:00:00:00:00
- Now let’s give this file executable permissions
chmod a+x WOLscript.sh
- You can now run WOLscript.sh to wake your machine(s) up.
That’s pretty much it on how to Install Wake on Lan on a NAS. I suggest you to back up the files you’ve modified as if you need to do it from scratch, you can just copy those files over rather than type the whole thing again.
